


Your IP address, approximate location, and online activity are visible every time you connect to Omegle or its alternatives. If that makes you uncomfortable, you’re not being paranoid—you’re being realistic. The solution is simpler than you might think: a VPN (Virtual Private Network) routes your connection through encrypted servers, hiding your real identity from the platforms you use and anyone monitoring your network.
This guide walks you through everything you need to know about using a VPN specifically for Omegle, from understanding why it matters to complete setup instructions you can follow in under 15 minutes.
Step 1: Why You Need a VPN for Omegle
When you connect to Omegle without a VPN, your actual IP address gets logged by the platform. This information can theoretically be used to determine your general geographic location, track your activity across sessions, and potentially be shared with third parties or authorities if requested.
The situation becomes more concerning on shared networks. At home with family members, in dormitories, at coffee shops, or anywhere others share your internet connection, your browsing activity—including video chat sessions—can potentially be monitored at the network level.
Using a VPN creates an encrypted tunnel between your device and the internet. Your ISP sees only encrypted traffic going to a VPN server; Omegle sees only the VPN server’s IP address, not yours. This provides meaningful protection against network monitoring and IP-based tracking.
According to techresearchjournal’s comparison of privacy-focused VPNs, modern VPN services use AES-256 encryption and modern protocols like WireGuard, providing strong protection while maintaining connection speeds suitable for video chat. The privacy benefits justify the minimal performance impact for most users.
If you’re using public WiFi regularly for video chat sessions, a VPN is especially important. These networks are inherently insecure, and anyone on the same network can potentially intercept unencrypted traffic. A VPN protects you from this vulnerability regardless of where you’re connecting from.
Step 2: Choosing the Right VPN Service
Not all VPN services are created equal, and the differences matter when privacy is your goal. Based on current market offerings, focus on these key features when selecting a VPN for Omegle use:
Strict No-Logs Policy: This means the VPN provider doesn’t record your browsing activity, connection timestamps, or IP addresses. Look for providers that have undergone independent audits verifying their no-logs claims. Services like NordVPN, ProtonVPN, and Mullvad have all had their policies independently verified.
Kill Switch: This feature automatically disconnects your internet if the VPN connection drops unexpectedly. Without a kill switch, your real IP address could be exposed during brief connection interruptions. For video chat where connections might fluctuate, this protection is essential.
Fast Connection Speeds: Video chat requires stable, reasonably fast internet. Some VPN services significantly throttle speeds or create noticeable latency. Look for services offering WireGuard protocol, which provides excellent security with minimal performance impact.
Server Network: Having servers in multiple countries gives you flexibility in appearing to connect from different locations. This is useful if you want to access content restricted to certain regions or simply want more location options.
Multiple Device Support: You’ll likely want VPN protection on your phone and computer. Look for services allowing multiple simultaneous connections so you can protect all your devices under one subscription.
Most reputable VPN services cost between $3-12 per month. Free VPNs are generally not recommended because they often make money through data collection, which defeats the purpose of using a VPN for privacy. For more details on choosing the right provider, PrivacyRadar’s VPN comparison provides detailed analysis of current market options.
Most services offer money-back guarantees, allowing you to test their features before committing long-term.
Step 3: Installing Your VPN
Once you’ve chosen a VPN provider, installation is straightforward. Here’s how to get set up:
For Desktop (Windows/Mac):
- Go to your VPN provider’s website and create an account
- Download the desktop application for your operating system
- Run the installer and follow the on-screen prompts
- Sign in with your new account credentials
- The app will ask permission to add VPN configuration—click yes/allow
For Mobile (iOS/Android):
- Download your VPN provider’s app from the App Store or Google Play
- Open the app and sign in with your account
- Approve the “Add VPN Configuration” prompt when it appears
- Select your preferred server location
- Tap Connect—you’ll see a VPN icon appear in your status bar
The entire installation process typically takes under 5 minutes for most users. For additional setup guidance, Help by Experts’ VPN setup guide provides detailed instructions for all major platforms.
Step 4: Configuring VPN Settings for Omegle
After installation, take a moment to adjust settings for optimal Omegle use:
Enable the Kill Switch: Find this setting in your VPN app’s preferences or security settings and turn it on. This ensures your IP stays protected even if the VPN connection drops momentarily.
Set Auto-Connect: Configure your VPN to connect automatically when you open certain apps or connect to specific networks. This prevents accidentally browsing without protection.
Choose Protocol: If your VPN offers protocol options (OpenVPN, WireGuard, IKEv2), select WireGuard for the best balance of speed and security. It consistently outperforms other protocols in speed tests while maintaining strong encryption.
Select Server Location: For Omegle use, a nearby server typically provides the fastest speeds. If you want to appear to connect from a different country (for accessing region-restricted content), choose that location instead. You can always switch locations based on your needs.
Enable DNS Leak Protection: This setting ensures your DNS requests go through the VPN tunnel rather than your ISP’s servers, preventing another avenue for IP exposure.
Most VPN apps have user-friendly interfaces with these settings clearly labeled. You don’t need to adjust everything—enabling the kill switch and auto-connect covers the essentials for privacy protection.
Step 5: Testing Your Connection
Before relying on your VPN for privacy-sensitive activities, verify it’s working correctly:
Check Your IP Address: Before connecting to your VPN, visit a site like whatismyip.com and note your IP address. After connecting to the VPN, refresh the page—your IP should show a different address, belonging to the VPN server location you selected.
Test for DNS Leaks: Visit dnsleaktest.com while connected to your VPN. Run the extended test to confirm your DNS requests are going through the VPN and not your ISP’s servers.
Verify Connection Stability: Use your video chat platform briefly while connected to the VPN. Confirm the connection is stable and you don’t experience excessive lag or disconnections. If problems occur, try a different server location closer to you.
These verification steps take just a few minutes but confirm your VPN is actually protecting your privacy as intended. If tests reveal issues, check your VPN settings or contact your provider’s support for troubleshooting assistance.
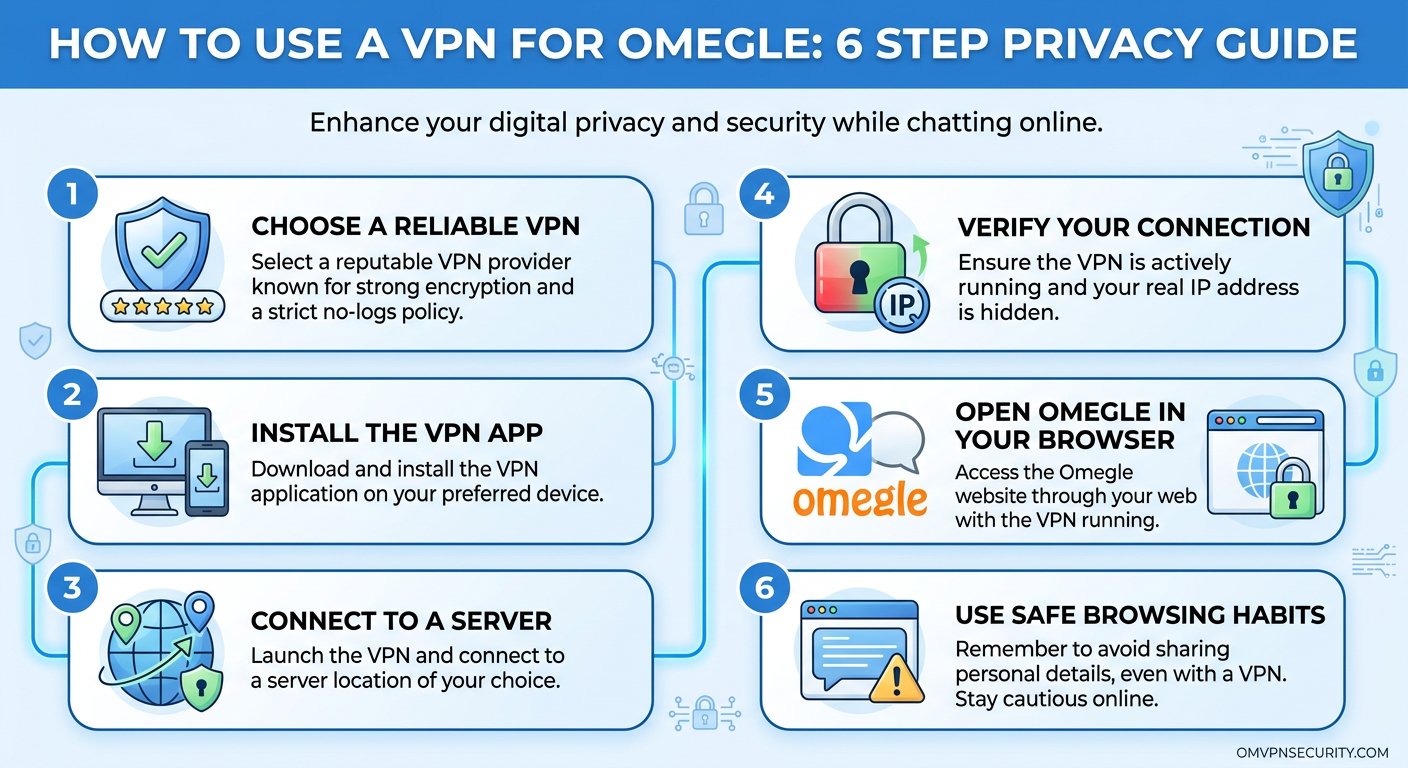
Step 6: Maintaining Privacy During Chats
A VPN protects your network-level identity, but comprehensive privacy requires additional awareness:
Keep the VPN Active: Always maintain your VPN connection during video chat sessions. Some users disconnect briefly “just to check something” and forget to reconnect, leaving subsequent chats unprotected.
Be Mindful of Other Information: Your IP address is hidden, but other information can still identify you: your camera background, accent, specific personal details you share. A VPN doesn’t make you anonymous—it protects your connection privacy.
Use Separate Accounts: If you create accounts on video chat platforms, consider using an email address that doesn’t identify you. The VPN protects your connection; platform accounts can still be traced to your email.
For Maximum Privacy: Consider using a dedicated browser for video chat activities, cleared of cookies and tracking data from your regular browsing. This prevents cross-site tracking even if your VPN is active.
For additional privacy strategies while using video chat platforms, see our webcam privacy protection guide which covers complementary security measures beyond VPN use.
Using a VPN doesn’t make you invisible, but it significantly raises the bar for anyone trying to track your online activity. Combined with awareness of what information you share in conversations, a VPN provides meaningful protection for your privacy while using Omegle and similar platforms.
The setup takes 15 minutes, and the protection is continuous. Once configured, your VPN runs in the background, automatically encrypting your connection and hiding your IP address every time you connect. For anyone serious about privacy during video chat, this is one of the most effective steps you can take.